How-to: change the DNS servers of a MikroTik router without bypassing Pi-hole
Change the MikroTik DNS servers to a single Pi-hole with RouterOS Safe Mode: three commands, three dig checks, and why a second public resolver bypasses it.
To change the MikroTik DNS servers of my home router, I replaced a list of two resolvers with a single one: my Pi-hole. The router answers DNS queries for my WireGuard peers and for the IPv6 clients of my LAN, so a second public resolver in its list let filtered domains slip through. Here is the procedure I follow, step by step, with RouterOS Safe Mode as a safety net.
Quick answer — make a RouterOS 7 router resolve only through Pi-hole.
# In a Winbox terminal or over SSH, press Ctrl+X first (Safe Mode)
/ip dns set servers=192.168.88.19
/ip dns cache flush
/ip dns print
# Test from a LAN host, then press Ctrl+X again to keep the change
Details, explanations and checks follow below. Addresses are examples.
Why a second resolver breaks the filter
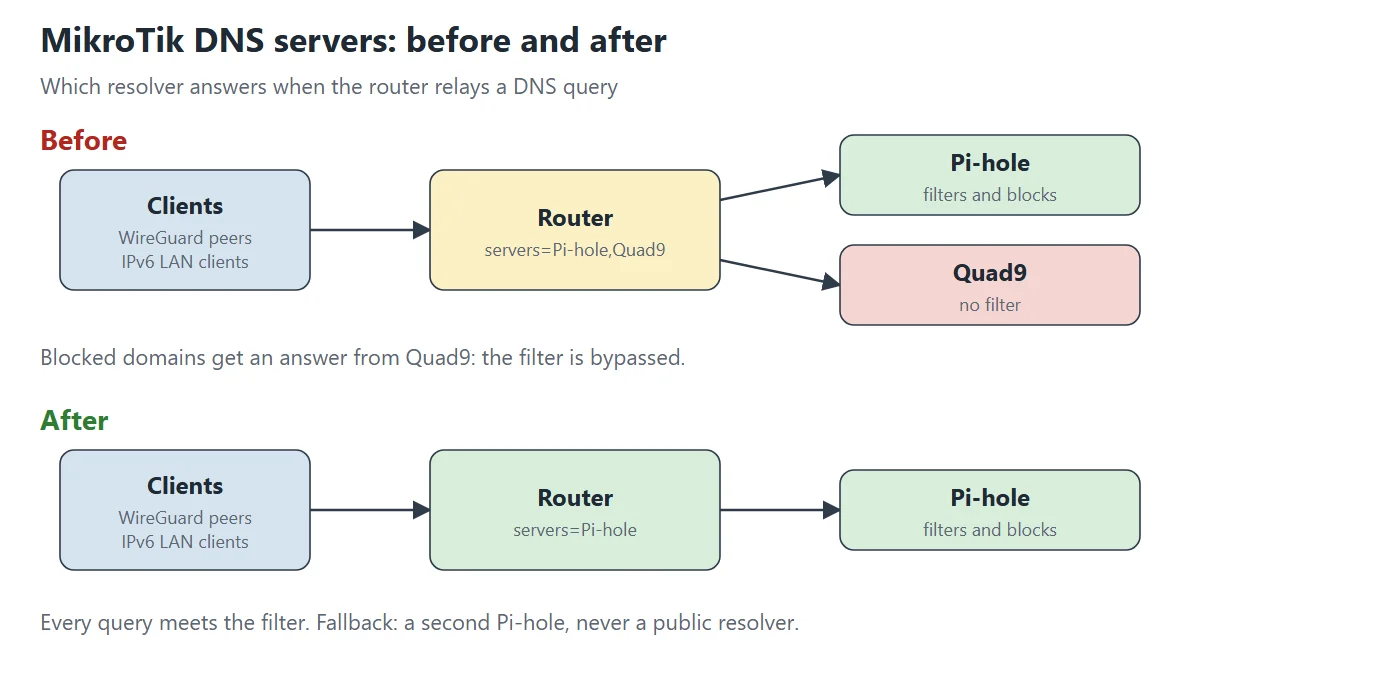
My router is not only a gateway. It also answers DNS queries for two groups of clients. First, the WireGuard peers: my phone uses one WireGuard interface, and my servers use another. Second, the IPv6 clients of the LAN, because the router advertises itself as their DNS server in router advertisements (/ipv6 nd with advertise-dns=yes).
Until October 2026, the list of MikroTik DNS servers contained my Pi-hole and Quad9 (servers=192.168.88.19,9.9.9.9). Because of that second entry, domains that Pi-hole blocks were resolved by Quad9 instead, so the filtering was bypassed. The fix is simple: leave only the Pi-hole in the list.
Before you start
- A router that runs RouterOS 7. Mine is not managed by Ansible.
- A recent copy of its configuration. Mine comes from a nightly backup of the router configuration.
- A terminal on the router: a Winbox New Terminal, or SSH as
admin. - The address of your Pi-hole. In this article the router is 192.168.88.1 and the Pi-hole is 192.168.88.19, which are example values.
Then learn Safe Mode, because it protects you if you cut your own access. In the CLI, you press Ctrl+X to enter it. While it is active, RouterOS tracks your changes. If the connection drops, the router undoes them, and the RouterOS documentation says this happens after the TCP timeout, which it gives as 9 minutes. When everything works, you press Ctrl+X again to leave Safe Mode and keep the changes.
Step 1: enter Safe Mode
Open the terminal and press Ctrl+X. From this moment, a dropped session rolls everything back.
Step 2: change the MikroTik DNS servers
Run the four commands below. The first one sets the single server, then the second one empties the cache so that the router stops answering from the old entries. The third one shows the result. The last one checks that the WAN DHCP client adds no DNS server from the provider.
# Only the Pi-hole answers from now on
/ip dns set servers=192.168.88.19
# Empty the router's DNS cache
/ip dns cache flush
# Show the result
/ip dns print
# The WAN DHCP client must not add DNS servers from the ISP (look for use-peer-dns=no)
/ip dhcp-client print detail where interface=<your-wan-interface>
Step 3: test from a LAN host
Before you leave Safe Mode, query the router from another machine. Three answers tell you that the chain works.
# A domain blocked by Pi-hole: 0.0.0.0 means the query went through Pi-hole
dig +short doubleclick.net @192.168.88.1
# A normal domain: a real address
dig +short example.com @192.168.88.1
# A name of one of my WireGuard peers: the router can still resolve it
dig +short peer01.example.net @192.168.88.1
If the blocked domain returns a real address, the filter is still bypassed, so stay in Safe Mode and look at the list again. If the third name fails, the router lost the link with its peers, so do not keep the change.
Step 4: keep the change
When the three tests pass, press Ctrl+X again. RouterOS leaves Safe Mode and keeps your changes.
Step 5: confirm it the next morning
The next morning, I open the nightly backup of the router configuration. It shows the new /ip dns section, which proves that the change survived and that it is recorded.
If something goes wrong
- If your session drops during the change, the router rolls everything back by itself, thanks to Safe Mode.
- If the Pi-hole goes down, the router resolves nothing new. The existing WireGuard tunnels survive.
- The proper fallback is a second Pi-hole, never a public resolver, because a public resolver brings back the bypass.
What I take away
- A router that answers DNS for other clients must follow the same filter as the LAN.
- Check the MikroTik DNS servers on every router that relays queries, not only on the clients.
- Use Safe Mode for every remote change, and test before you press Ctrl+X the second time.