How-to: a well-tuned fail2ban, with progressive bans
Tune fail2ban: jail.local line by line, thresholds, progressive bans, not banning yourself, the firewall action and an SSH jail that really sees lines.
A well-tuned fail2ban comes down to jails: what to watch, with which thresholds, and how to ban. This tutorial gives the real configuration of my Rocky Linux servers: progressive bans, four levels of repeat-offender handling, a jail for an in-house application, and the checks that tell you all of it really works.
fail2ban is one of the oldest and most widespread tools in the admin’s kit: it reads logs, counts authentication failures and bans overly insistent addresses at the firewall. Simple on paper, it’s still often badly tuned: ten-minute bans that stop nobody, settings written in a file the next update overwrites, an SSH jail that sees no line because it reads the wrong log, or an admin banned from their own server.
Three concepts
| Concept | What it is | Where |
|---|---|---|
| filter | the regular expressions that recognise a failure in a log | filter.d/*.conf |
| action | what is done to ban and unban (firewalld rule, nftables, email…) | action.d/*.conf |
| jail | a filter, a log source, an action and thresholds tied together | jail.local, jail.d/*.local |
Step 1: install, and never touch jail.conf
dnf install epel-release
dnf install fail2ban fail2ban-firewalld
systemctl enable --now fail2ban
The fail2ban-firewalld package installs a file making firewalld the default action. jail.conf and fail2ban.conf belong to the package and will be replaced on the next update: all your settings go into the .local files, which override them key by key. A jail.local can therefore hold only the few lines that differ.
Step 2: the service itself
# /etc/fail2ban/fail2ban.local
[DEFINITION]
logtarget  = /var/log/fail2ban/fail2ban.log
dbfile     = /var/lib/fail2ban/fail2ban.sqlite3
dbpurgeage = 35d
logtarget: a dedicated file rather than the system log. It will feed the repeat-offender jail, and it’s easier to read;
dbfile: the SQLite database where fail2ban keeps current bans and their history. It’s what restores bans after a restart, and knows how many times an address has already been banned;
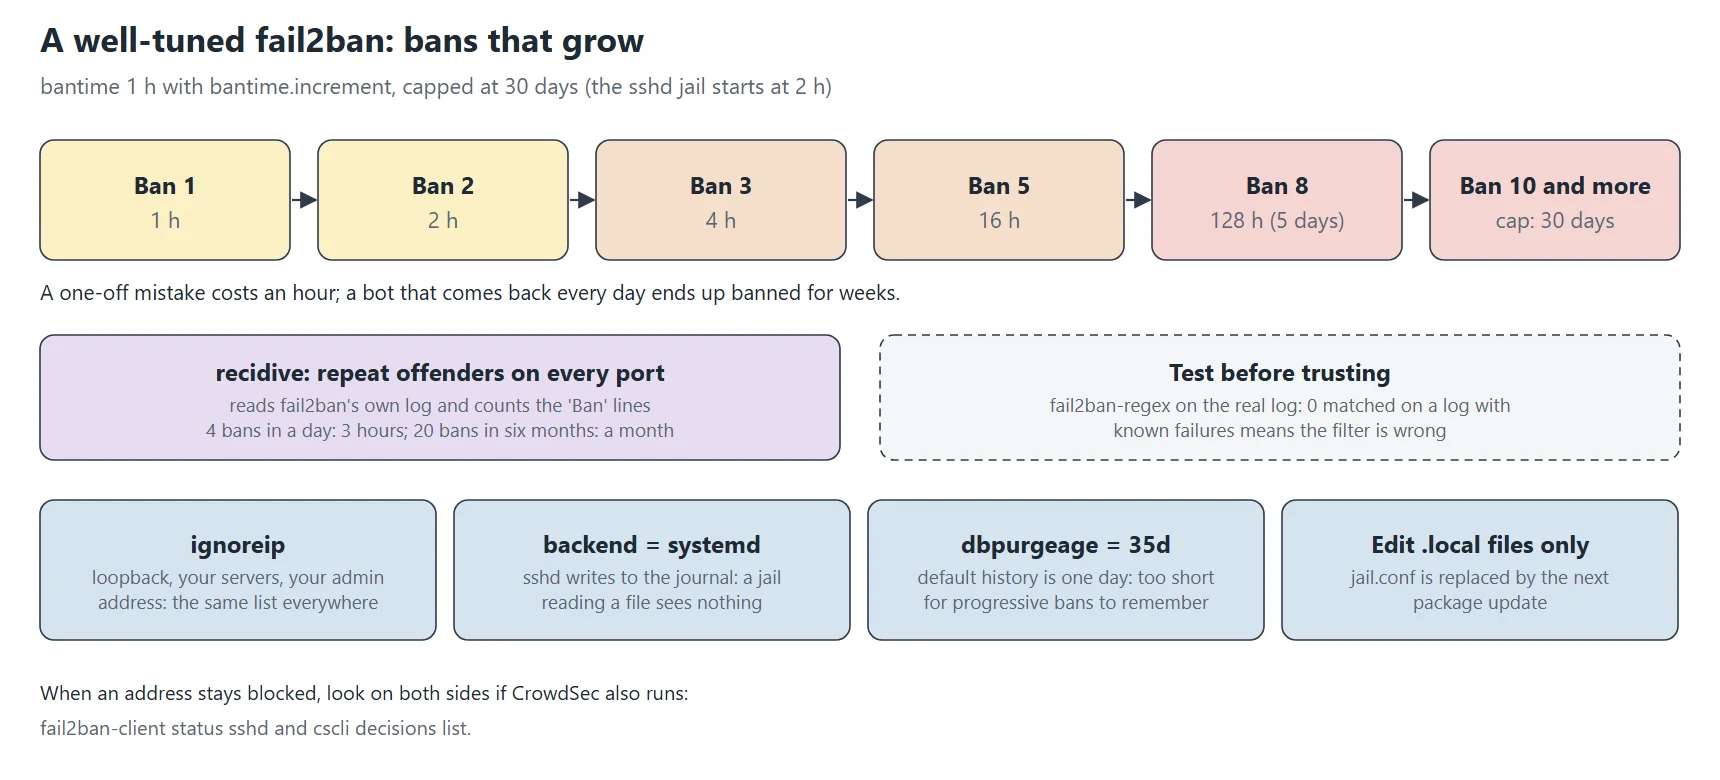
dbpurgeage: how long the history is kept. Default is one day only: too short for progressive bans and six-month recidive to have any memory. 35 days is a compromise; the long recidive relies on the log file anyway.
Create the directory and file before restarting: install -d /var/log/fail2ban && touch /var/log/fail2ban/fail2ban.log. Also adapt the package’s logrotate configuration to this new path.
Step 3: jail.local, line by line
# /etc/fail2ban/jail.local
[DEFAULT]
ignoreip  = 127.0.0.1/8 ::1 203.0.113.25 203.0.113.40 198.51.100.10
bantime   = 1h
findtime  = 10m
maxretry  = 5
bantime.increment = true
bantime.formula   = ban.Time * (1<<(ban.Count if ban.Count<20 else 20)) * banFactor
bantime.maxtime   = 720h
banaction          = firewallcmd-rich-rules
banaction_allports = firewallcmd-rich-rules

[sshd]
enabled  = true
backend  = systemd
maxretry = 5
bantime  = 2h
Not banning yourself
ignoreip lists addresses never banned: loopback, the public address of each of your servers, and your admin access address. Without it, a few failed test logins are enough to lock you out, and a server querying another with a wrong password will also get it banned. Put the same list everywhere.
Thresholds
findtime and maxretry: 5 failures in 10 minutes trigger a ban. If it is lower, you ban users who mistype their password; higher, and bots get more tries. For SSH, if only key authentication is allowed, a legitimate user almost never fails and you can go down to 3.
Progressive bans
bantime.increment turns on automatic lengthening. The formula multiplies the base duration by 2 to the power of the address’s number of previous bans (1<<n is 2n), capped at 220 to avoid overflow, then by banFactor (1 by default). bantime.maxtime caps the result at 30 days:
| Ban # | Duration (bantime 1 h) | Duration (sshd jail, 2 h) |
|---|---|---|
| 1 | 1 h | 2 h |
| 2 | 2 h | 4 h |
| 3 | 4 h | 8 h |
| 5 | 16 h | 32 h |
| 8 | 128 h (5 d) | 256 h (10 d) |
| 10 and more | cap: 30 d | cap: 30 d |
The effect is exactly what you want: a one-off mistake costs an hour, a bot that comes back every day ends up banned for weeks after a dozen visits.
The action
banaction = firewallcmd-rich-rules: each ban becomes a firewalld rich rule rejecting the address on the jail’s port. banaction_allports is the action used by jails that ban on every port (recidive). If a server has no firewalld, use nftables-multiport and nftables-allports.
The SSH jail
backend = systemd is essential on Rocky Linux: sshd writes to the systemd journal, so a jail reading a file would see nothing, with no error. The jail reads entries for the sshd.service unit. A second subtlety: recent OpenSSH versions write some of their messages under the name sshd-session. If fail2ban-client status sshd stays at zero while failures show up in journalctl, check that your fail2ban version’s filter knows that name (journalmatch).
Step 4: punishing repeat offenders
The recidive jail reads fail2ban’s own log and counts the “Ban” lines. An address banned several times, whatever the jail, is then banned on every port, for longer. Four tiers complement progressive bans well:
[recidive1]
enabled   = true
filter    = recidive
logpath   = /var/log/fail2ban/fail2ban.log
banaction = %(banaction_allports)s
findtime  = 1d
maxretry  = 4
bantime   = 3h

[recidive2]
enabled   = true
filter    = recidive
logpath   = /var/log/fail2ban/fail2ban.log
banaction = %(banaction_allports)s
findtime  = 1w
maxretry  = 7
bantime   = 1d

[recidive3]
enabled   = true
filter    = recidive
logpath   = /var/log/fail2ban/fail2ban.log
banaction = %(banaction_allports)s
findtime  = 30d
maxretry  = 10
bantime   = 1w

[recidive4]
enabled   = true
filter    = recidive
logpath   = /var/log/fail2ban/fail2ban.log
banaction = %(banaction_allports)s
findtime  = 180d
maxretry  = 20
bantime   = 30d
Each tier has its own window: when an address earns 4 bans in a day, it stays banned for 3 hours on every port; 20 times in six months, for a month. Long windows mean keeping the log long enough, because the recidive jail reads it: also set rotation to keep at least six months, compressed. The jail refuses to start if the log file doesn’t exist yet, hence creating it in step 2.
Step 5: a jail for your own application
If an application has no shipped filter, write one. Take an application that logs in JSON:
# /etc/fail2ban/filter.d/myapp.conf
[Definition]
failregex = ^.*"msg":"login failed".*"remote_ip":"<HOST>".*$
ignoreregex =
datepattern = "time":"%%Y-%%m-%%dT%%H:%%M:%%S
<HOST>: the part that captures the address to ban; fail2ban replaces it with an expression matching IPv4 and IPv6;
datepattern: how to read the line’s date. fail2ban ignores lines older than findtime, so it must understand the date. The %% are escaped % for the file format;
ignoreregex: lines never to count, even if they match.
# /etc/fail2ban/jail.d/myapp.local
[myapp]
enabled  = true
filter   = myapp
logpath  = /var/log/myapp/app.log
port     = 2022,8443
maxretry = 5
port limits the ban to the application’s ports: the offending address keeps access to the rest, unless it reoffends.
Step 6: testing a filter before enabling it
fail2ban-regex /var/log/myapp/app.log /etc/fail2ban/filter.d/myapp.conf
#   Failregex: 12 total
#   Lines: 4821 lines, 0 ignored, 12 matched, 4809 missed
fail2ban-regex --print-all-matched /var/log/myapp/app.log /etc/fail2ban/filter.d/myapp.conf
A filter that finds nothing (“0 matched”) on a log with known failures is wrong; but a filter that finds too much (successful logins) will ban your users. Also check the “Date template hits” line: if the date isn’t recognised, no line will ever be counted in production. For SSH with the systemd backend: fail2ban-regex systemd-journal sshd.
Step 7: check and operate
fail2ban-client -t                         # is the configuration valid?
systemctl restart fail2ban
fail2ban-client status                     # active jails
fail2ban-client status sshd                # counted failures, banned addresses
fail2ban-client get sshd banip --with-time # with each ban's end
fail2ban-client set sshd unbanip 192.0.2.66
fail2ban-client unban --all                # in an emergency
firewall-cmd --list-rich-rules | grep -c reject
Do the test for real, from an address not in ignoreip (a mobile connection, for instance): five wrong passwords, then check that the sixth attempt is refused and the address shows in the jail’s status.
What it looks like after a few months
My web server on 2 November 2026 (fail2ban 1.1.0). The SSH jail reads the systemd journal, and four recidive jails stack up behind it:
# fail2ban-client status
|- Number of jail:	5
`- Jail list:	recidive1, recidive2, recidive3, recidive4, sshd

# fail2ban-client status sshd
|- Filter
|  |- Currently failed:	0
|  |- Total failed:	6
|  `- Journal matches:	_SYSTEMD_UNIT=sshd.service + _COMM=sshd + _COMM=sshd-session
`- Actions
   |- Currently banned:	2
   |- Total banned:	2

# for j in recidive1 recidive2 recidive3 recidive4; do ...; done
recidive1: bantime=10800   findtime=86400    maxretry=4
recidive2: bantime=86400   findtime=604800   maxretry=7
recidive3: bantime=604800  findtime=2592000  maxretry=10
recidive4: bantime=2592000 findtime=15552000 maxretry=20
Total failed: 6 since this morning’s reboot. Once you disable password logins, almost nobody even gets as far as a failed attempt: most scanners give up at key exchange. The counters reset with the service; the history lives in the database.
Journal matches lists both sshd and sshd-session: since OpenSSH 9.8, authentication messages come from the sshd-session process. A filter that only matches _COMM=sshd silently counts nothing on a recent system.
The four recidive jails read fail2ban’s own log: 4 bans in a day give 3 hours, 7 in a week give a day, 10 in a month a week, 20 in six months a month.
The progressive bans are visible in fail2ban’s SQLite database, which keeps each address with its ban count:
# sqlite3 -readonly /var/lib/fail2ban/fail2ban.sqlite3 \
    "select jail, bancount, count(*) from bips group by jail, bancount"
recidive3|1|1
sshd|1|21
sshd|3|1
sshd|7|1
sshd|10|1

# sqlite3 -readonly /var/lib/fail2ban/fail2ban.sqlite3 "select max(bantime) from bips where jail='sshd'"
2592000
Twenty-one addresses were banned once and never came back: that’s the bulk of the traffic, opportunistic scanners. Three came back, one of them ten times. For that one, each ban doubled the previous duration until it hit bantime.maxtime = 720h: 2 592 000 seconds, thirty days, the ceiling. That’s the point of the increment: the first offence costs little, the stubborn ones end up excluded for a month without any manual list to maintain.
Common failures
The jail counts nothing
Wrong backend (file instead of systemd), wrong log path, or unrecognised date. fail2ban-client status <jail> shows the source read; fail2ban-regex tells whether lines match.
Addresses are banned but still get through
The action doesn’t match the firewall actually in use (an iptables action on a pure nftables system, for example), or traffic arrives through a reverse proxy and it’s the proxy’s address that gets banned. Behind a proxy, the application must log the client’s real address (X-Forwarded-For), and the ban must happen on the machine that receives the connection.
An address is blocked though fail2ban doesn’t ban it
If CrowdSec runs too, it may have made its own decision: cscli decisions list --ip …. The two complement each other well (fail2ban reacts to your own logs, CrowdSec adds richer scenarios and a community list), but remember to look on both sides.
fail2ban takes a long time to start
On every start it restores current bans from its database and rereads the end of the logs. With thousands of entries and firewalld rich rules, that can take a minute. A set-based nftables action (nftables-allports) is much faster as the number of bans grows.
This post is part of a series of sysadmin tutorials (tag “how-to”).
Series “How-to”, tutorial 11/77. · ← Previous tutorial · Next tutorial → (coming 16 Nov) · Version française
Official documentation
fail2ban, project repository
fail2ban documentation, filters, actions and jails
Related articles
Installing CrowdSec at the firewall